Table of Contents
A well-designed wet room can make your everyday shower feel like a private five-star ritual. You choose honed stone, ultra-clear glass, and discreet linear drainage that disappears into the floor. You plan clean clearances, quiet ventilation, and slip-resistant texture that looks couture, not clinical. Then you layer lighting, warm the floor underfoot, and tuck storage into seamless niches—because the smallest decisions are where luxury either happens or fails…
Decide If a Wet Room Suits Your Bathroom
Whether you’re chasing a spa-caliber aesthetic or simply craving a cleaner, more architectural layout, you’ll want to confirm a wet room truly complements your bathroom before you commit. You’ll love it if you prefer uninterrupted stone, seamless glass, and a hotel-level sense of calm.
You’ll need to be realistic about daily habits: if multiple people rush through mornings, an always-ready open zone can feel exposed and damp.
If you value curated bathroom accessories—towel ladders, floating trays, sculptural dispensers—you’ll want pieces rated for moisture and easy wipe-down.
You can also align luxury with water conservation by choosing a thermostatic valve, efficient hand shower, and precise on/off controls that prevent waste while keeping comfort impeccable.
Plan Your Wet Room Layout and Clearances
Before you fall for a frameless panel and a full-slab floor, map the wet room like a boutique suite: set a generous shower zone, keep the main walkway dry, and position the drain so water naturally sweeps away from the door.
Give yourself luxe, hotel-grade clearances—at least 36 inches for circulation, 30 inches in front of the vanity, and an easy swing for the door or a pocket entry.
Float the shower screen far enough to catch overspray, but not so close you clip elbows.
Place the towel rail within one step of the dry zone, and align niches at shoulder height for a tailored look.
Plan bathroom ventilation early to tame water condensation and keep stone and mirrors pristine.
Choose a Wet Room Waterproofing System
Now you’ll choose a wet room waterproofing system that feels as tailored and luxe as the finishes you’ve specified, starting with membrane types—sheet, liquid-applied, or hybrid—each with its own sleek performance profile.
You’ll then match the membrane to the right substrate and lock it into a precise drain integration, so corners, seams, and penetrations stay impeccably sealed.
Finally, you’ll commit to an installation method and curing schedule that suits your timeline and climate, because that polished, hotel-grade calm depends on doing the chemistry right.
Waterproofing Membrane Types
Because a wet room’s elegance is only as dependable as what lies beneath the tiles, choosing the right waterproofing membrane system is the design decision that quietly protects every luxe finish you’ve specified.
For ultra-sleek builds, you’ll love sheet Waterproofing membranes: factory-thin, dimensionally stable, and perfect when you want crisp lines and predictable coverage.
Prefer couture-level adaptability? Liquid-applied membranes flow into corners and curves, creating a seamless, monolithic barrier that suits sculptural niches and statement benches.
Hybrid systems pair reinforcing fabric with liquid coats, delivering both flexibility and tensile strength—ideal when you’re balancing bold stone slabs with daily use.
Whatever you choose, treat membrane installation like tailoring: strict film thickness, clean overlaps, and compatible sealants, so your room stays immaculate.
Substrate And Drain Integration
Whether you’re specifying a minimalist linear channel or a discreet point drain, the substrate and drain assembly must lock into your waterproofing system like a couture seam—flat, rigid, and flawlessly sealed.
You’ll choose a system that pairs with a bonded, pre-sloped tray or a reinforced screed that won’t flex under stone, terrazzo, or large-format porcelain.
Prioritize substrate preparation: confirm plane, deflection, and edge progression; then select primers and boards that your membrane manufacturer approves.
At the drain, insist on an integrated bonding flange, adjustable collar, and a grate finish that matches your metals—brushed brass is trending.
Specify clean-out access and hair-trap compatibility for effortless drain maintenance, and guarantee the drain body’s material aligns with your water chemistry and cleaning regimen.
Installation Method And Curing
If you want a wet room that feels as seamless as a boutique spa, you’ll choose a waterproofing system whose installation method and curing window match your site conditions and finish schedule.
Sheet membranes give you crisp seams and instant tileability once you’ve rolled the corners tight, while liquid-applied systems hug niches and benches with couture-like precision but demand measured coats and dry-time discipline.
You’ll plan curing around humidity, temperature, and bathroom ventilation, because trapped moisture can cloud adhesion and invite pinholes.
Fast-curing hybrids suit tight remodel timelines, yet you’ll still respect flood-test windows before setting stone or terrazzo-look porcelain.
Detail the progression, seal penetrations, and protect fresh layers from traffic.
A flawless cure supports water conservation too, preventing hidden leaks that waste water behind walls.
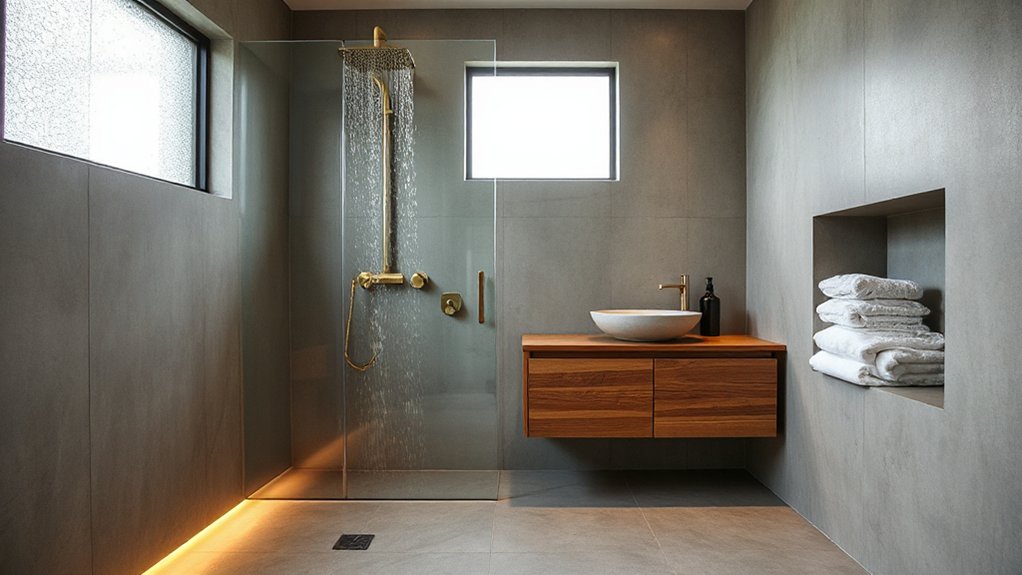
Set the Wet Room Slope and Drain Location
Where should the floor fall, and where should the water disappear? Start with Drain placement: center drains feel classic, while linear drains read ultra-modern and let you showcase large-format slabs with uninterrupted veining. Place the drain where your shower spray naturally lands, and keep it accessible for future maintenance without disrupting the room’s symmetry.
Next, perfect Slope calculation so water glides, not races. Aim for a consistent pitch toward the drain, and keep transitions seamless at the entry so the space stays spa-sleek and barrier-free. Use a single-plane fall for linear drains to get that tailored, architectural look; use four-way falls only when you must.
Confirm your pitch with a straightedge, then water-test the pan before you commit to finishes.
Pick Slip-Resistant Wet Room Surfaces
Now that you’ve set the slope and drain, you’ll lock in confidence underfoot by choosing slip-resistant surfaces that still read luxe.
You can opt for slip-resistant tile options—think matte porcelain, micro-mosaic, or R-rated finishes—that grip when wet without sacrificing a tailored, design-forward look.
For a more organic statement, you’ll love textured stone flooring like honed or flamed limestone and slate, where subtle ridges add traction and a spa-grade, couture feel.
Slip-Resistant Tile Options
Although a wet room can look effortlessly luxe, it demands a floor surface that grips underfoot without sacrificing style. So your tile choice should start with slip resistance. Choose porcelain rated R10–R11 (or DCOF ≥0.42) to keep footing secure while staying sleek.
Small-format mosaics—2″ hex, penny rounds, or herringbone kits—add luxe sparkle and extra grout lines for traction, especially on a gentle slope. For seamless elegance, pick matte or satin glazes over high-polish; they read modern and photograph beautifully.
Let Color schemes lead: inky charcoal, warm greige, or soft alabaster tiles elevate the room and flatter brass, black, or chrome fixture styles. Finish with matching slip-rated shower-floor sheets for cohesion.
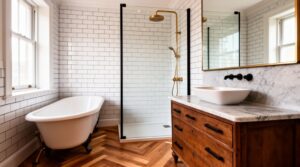
Textured Stone Flooring
Want that boutique-spa gravitas underfoot without flirting with slips? Choose textured stone flooring that’s honed, flamed, or bush-hammered so water disperses and your footing stays sure. Limestone with a subtle tumbled finish reads warm and architectural; slate brings inky depth and a naturally grippy cleft surface.
You’ll get Natural textures that feel curated, not rustic, especially when you seal with a matte, penetrating sealer that preserves tone and traction.
Lean into design contrasts: pair charcoal basalt with pale microcement walls, or set sand-toned travertine against brushed brass drains. Specify smaller-format stone or a scored pattern to multiply grout lines for extra grip, then slope precisely to a linear drain for seamless flow.
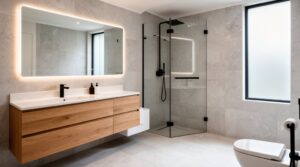
Add a Wet Room Screen Without Blocking Light
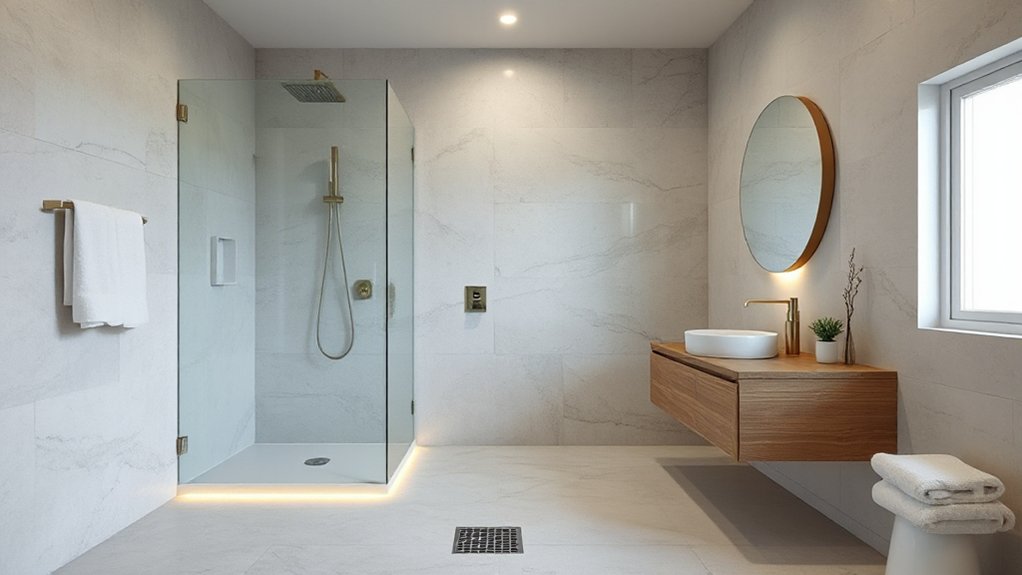
Whether you’re curating a spa-caliber ensuite or refining a compact shower zone, you can add a wet room screen that contains spray without dimming the room’s natural glow. Choose low-iron, ultra-clear glass to keep sightlines crisp and color true, then specify a minimal channel set flush to the floor for a tailored, hotel-grade finish.
Position the panel to intercept the shower’s trajectory, not the window’s light path, and you’ll avoid the heavy feel of Light blocking barriers.
For a couture edge, opt for slimline blackened steel or brushed brass framing that reads like jewelry, not structure. You can also float the screen slightly off a side wall to create an airy reveal, while maintaining splash control and a seamless, luminous feel with Wet room screens.
Build Wet Room Niches and Recessed Storage
A sheer wet room screen keeps the light moving; now give your shower wall the same tailored restraint with niches and recessed storage that swallow clutter without stealing a millimeter of floor space.
Frame Wet room niches in the same tile as the field for seamless calm, or wrap them in honed marble to spotlight your ritual objects like gallery pieces. Set the niche at elbow height, then add a slimmer ledge for razors and minis, so everything reads intentional.
Specify squared edges for a modern, architectural cut, or a softly arched reveal for boutique-hotel romance. Line recessed storage with waterproof LED strips and choose matte black or brushed brass trims to sharpen contrast.
You’ll keep bottles off the floor and your sightlines immaculate.
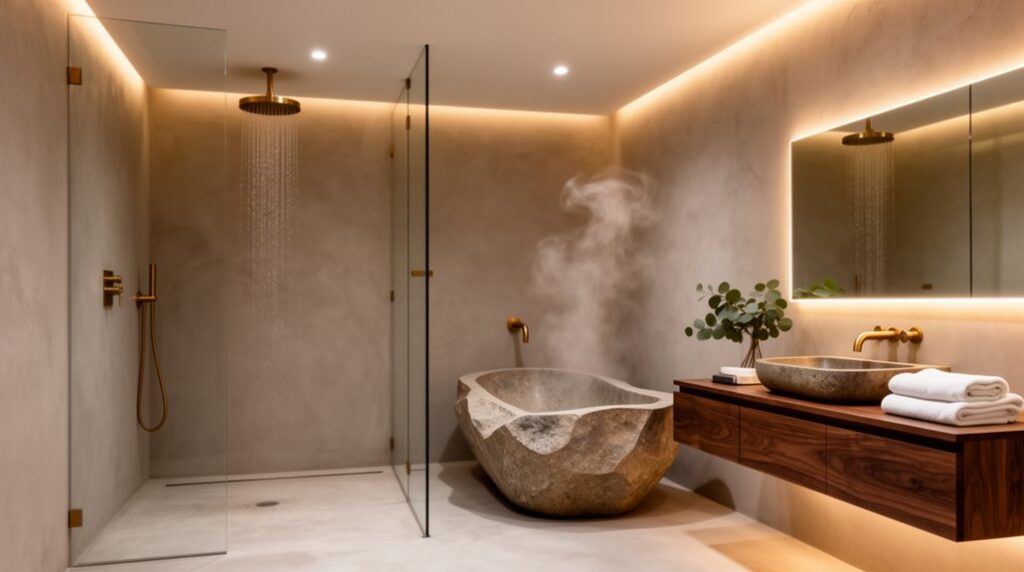
Add Underfloor Heating for Wet Room Comfort
You’ll elevate your wet room instantly with underfloor heating that keeps tiles silk-warm, speeds drying, and banishes that post-shower chill while staying visually invisible.
You’ll also curb damp-friendly odors and condensation because the floor becomes a discreet, radiant heat source that supports a cleaner, more luxurious finish.
Choose the right system—electric mats for swift, boutique-style retrofits or hydronic loops for whole-room efficiency—based on your floor build-up, running costs, and the level of control you want.
Benefits Of Underfloor Heating
As the water cools on stone and tile, underfloor heating keeps your wet room feeling indulgently warm, never clammy. You step out of the shower onto heat that rises evenly, so your feet don’t flinch and your towels dry faster between uses.
That gentle radiant warmth reduces condensation on mirrors and grout, helping surfaces look freshly detailed, not perpetually damp. You’ll notice fewer drafty temperature swings, because the heat hugs the room from the ground up, like a spa suite in miniature.
It pairs effortlessly with Amphibious architecture and Marine inspired decor: ribbed porcelain, sea-glass mosaics, brushed brass, and limestone read richer when they’re touch-warm. With consistent comfort, you linger longer, turning routine rinses into daily rituals.
Choosing The Right System
Where should you start when choosing underfloor heating for a wet room that’s equal parts spa-luxe and seaworthy? Match the system to your build: electric mats suit renovations and boutique zones, while hydronic loops excel in whole-room, new-build grandeur.
Specify a thermostat with floor sensor and programmable setbacks, so warmth feels tailored, not wasteful.
Demand a waterproofing package designed to pair with heat, including decoupling membranes that prevent tile stress and keep grout pristine.
Prioritize bathroom ventilation: a quiet, high-capacity extractor protects finishes, speeds drying, and helps your heating work smarter.
For water conservation, choose rapid-response controls and zone only the walking paths, letting the towel rail finish the pampering.
Finish with slip-rated porcelain and a linear drain for runway elegance.
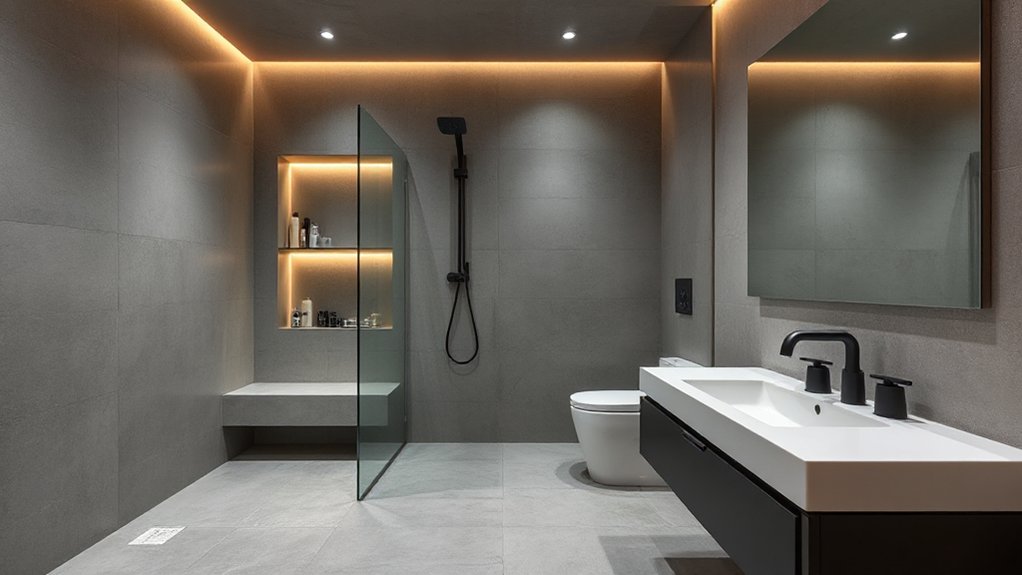
Use Layered Lighting for a Spa-Like Wet Room
Although a wet room’s surfaces steal the spotlight, layered lighting choreographs the entire spa mood—wrapping stone, tile, and steam in a controlled glow. Start with recessed, wet-rated downlights to deliver clean task light at the shower and vanity, then soften edges with dimmable wall washers that skim textured tile like silk.
Add a statement: a slimline pendant outside the splash zone or a backlit mirror that floats. For true Lighting ambiance, hide LED strips under benches, niches, and toe-kicks; they make the room feel larger and calmer.
Tune Color schemes with warm 2700K for honeyed serenity, or neutral 3000K to flatter veining and metals. Put scenes on smart controls, so you shift from sunrise brightness to midnight hush instantly.
Avoid Costly Wet Room Design and Install Mistakes
Even if your wet room looks like a magazine spread, one misjudged slope, membrane seam, or drain placement can turn that luxury into a slow, expensive leak. You’ll want a precise 1–2% pitch toward a linear drain, plus a continuous waterproofing system that wraps walls, niches, and bench edges like couture tailoring.
Specify compatible thinset, sealant, and drain flange—mixing brands can void warranties and invite failure.
Don’t skimp on bathroom ventilation: a quiet, high-CFM fan with humidity sensing protects plaster, stone, and matte microcement from bloom and staining.
For water conservation, choose thermostatic controls, low-flow rain heads, and a recirculating or demand hot-water setup. Then place shutoffs and cleanouts where you can actually reach them.
Your installer’s detailing should look flawless before tile ever shines.
Frequently Asked Questions
Do Wet Rooms Increase Home Resale Value Compared to Standard Bathrooms?
Yes, you can boost resale value with a wet room versus a standard bath, if you execute it well. Buyers crave Luxury features and Design flexibility, plus seamless waterproofing, sleek drainage, and spa-like finishes.
How Long Does a Wet Room Renovation Typically Take From Start to Finish?
Typically, you’ll wrap a wet room renovation in 2–6 weeks—sleek, swift, sumptuous—depending on structural surprises. You’ll gain Design flexibility and space optimization, but waterproofing, tiling, drainage, and curing timelines can’t be rushed.
Are Wet Rooms Safe for Children and Elderly Users With Mobility Issues?
Yes, you can make wet rooms safe for children and elderly users with mobility issues. Choose slip-resistant porcelain, linear drains, gentle slopes, grab bars, and thermostatic valves—plus childproof features and elderly accessibility for confident, luxe bathing.
What Cleaning Routine Keeps Wet Room Grout and Tiles Looking New?
You’ll keep grout and tiles looking new by rinsing daily and squeegeeing; 80% of staining comes from lingering moisture. Weekly, use pH-neutral cleanser and steam cleaning. Finish with quarterly grout sealing for a polished, couture sheen.
Can a Wet Room Be Added in a Rental Property Without Permanent Changes?
Yes, you can add a wet room in a rental, but you’ll need a Temporary installation: a removable shower base, sealed wall panels, and freestanding fixtures. Check Lease restrictions, protect subfloors, and prioritize luxe finishes.
Conclusion
When you design your wet room with intention, you turn a daily rinse into a private suite experience. You’ll confirm it suits your space, map clearances, and specify a proven waterproofing system, then nail the slope and drain for flawless flow. You’ll choose slip-resistant stone, carve sleek niches, and add underfloor heating for barefoot ease. Layered lighting seals the mood. Done right, your wet room becomes a jewel box—polished, practical, and enduring.