Table of Contents
Converting a garage into a playroom is one of those projects that sounds straightforward on paper and turns out to have more layers to it than the initial brief suggests — in a good way, mostly. The garage is there, the children need space, the logic seems obvious. What makes it interesting is that a garage and a playroom have almost nothing in common beyond four walls and a roof, and getting from one to the other properly involves a sequence of decisions that most families haven’t fully thought through before they start.
This is the account of one project we completed last year — a detached single garage on the side of a 1970s detached house in the East Midlands, converted into a playroom for two children aged five and eight. The family had already been through the planning question before they came to us — correctly establishing that the conversion fell within permitted development and didn’t require a planning application, though Building Regulations approval was needed throughout — so we were engaged at the design and build stage.
What We Were Starting With
The garage was typical of its era: a concrete block structure with a flat roof, single-skin walls, a concrete floor, a single-leaf metal up-and-over door on the front, and a personnel door on the side leading to the garden. Inside, approximately 5.2 metres by 2.8 metres — about 14.5 square metres, which is on the smaller side for a garage conversion but workable for a children’s playroom, particularly since children at that age don’t need adult furniture scale.
The flat roof was in reasonable condition — recently recovered in a single-ply membrane — so the decision was made to leave it rather than change the roof form. The single-skin concrete block walls were the more significant thermal challenge: single-skin construction is inherently poor insulation, and upgrading it to a habitable standard without building an internal skin that further reduces the already modest floor area required careful specification.
The concrete floor was in reasonable condition structurally but needed a damp-proof membrane, insulation, and a finished surface. No dampness had been apparent in the garage, but the concrete slab without a DPM was inappropriate for a room children would be spending time in.
Planning and Building Regulations
As noted, the clients had already confirmed the planning position. Converting an existing attached or detached garage to habitable use as an ancillary room within the residential curtilage — not a separate dwelling — generally falls within permitted development in England for houses, provided the conversion doesn’t involve extending the building or significantly altering the external appearance in ways that require permission.
The Building Regulations position is different, and this is the part that matters for quality and safety. Building Regulations approval was required for:
The structural elements — specifically the change from a garage door opening to a window and wall construction, which needed to be properly specified with an appropriate lintel over the new opening.
The thermal performance — walls, floor, and roof all needed to meet the U-value requirements for a habitable conversion.
The electrical installation — all new wiring needed to comply with Part P, carried out by a registered electrician and notified to Building Control.
Ventilation — habitable rooms require both background and purge ventilation, neither of which the existing garage provided.
We submitted a Full Plans application to Building Control at the outset, which meant the drawings were checked and approved before any work started. This is always preferable to a Building Notice for a conversion — it provides certainty on the specification before materials are purchased or built into the work.
The Structural Work: Wall, Opening, and Roof
The up-and-over garage door was the first thing to go. In its place, we created a new front elevation in cavity blockwork to match the existing walls — a rendered skin on the outside, blockwork inner leaf — with a new window positioned to bring good natural light into the space. The window is relatively generous given the modest overall dimensions of the room: a 1.5-metre-wide fixed and opening casement that sits centrally in the new front wall and provides both light and ventilation.
The lintel over the new window opening was specified by the structural engineer — a standard steel boot lintel bearing adequately on either side onto the existing blockwork. Straightforward work, but specified properly rather than assumed.
The existing personnel door on the side elevation was retained but upgraded: a new insulated door unit with a proper threshold seal and appropriate draught stripping replaced the original, which had been draughty and poorly fitting. The clients wanted the children to have direct access to the garden from the playroom, which this door provides.
The flat roof was assessed by a specialist roofing contractor and confirmed as sound — but its insulation was inadequate for habitable use. The solution was an additional layer of rigid insulation boards fixed to the existing roof structure externally, covered by a new layer of single-ply membrane. This warm roof approach — insulation above the structural deck — avoids interstitial condensation issues and significantly improved the thermal performance without requiring the existing ceiling to be lowered. The ceiling height inside was 2.4 metres, which is perfectly adequate, and losing any of it would have been a poor outcome in a room that’s already modestly sized.
Insulation: The Make-or-Break Specification
This is the specification element where corners are most commonly cut in garage conversions, and where the consequences of cutting corners are most felt in daily use. A poorly insulated converted garage is cold in winter, hot in summer, and costs disproportionately to heat — and children feel temperature discomfort more acutely than adults.
The single-skin blockwork walls were the challenge. We had two options: build an internal timber stud frame with insulation within the cavity, creating a warm room within the shell; or use high-performance rigid insulation boards fixed directly to the block face, with a minimal air gap maintained behind the finished plasterboard.
The floor area made the first option less attractive — a full internal stud frame with 100mm insulation and plasterboard would have taken approximately 150mm off the width of the room on each of the two long walls, reducing the 2.8-metre internal width to approximately 2.5 metres. That’s a meaningful reduction in a room that’s already not generous.
The solution was a slim-line composite insulated plasterboard system — 62.5mm boards with a PIR insulation core bonded to plasterboard, fixed directly to the block face with appropriate adhesive and mechanical fixings. This achieves a wall U-value of 0.26 W/m²K, which meets Building Regulations requirements and produces a room that performs properly without the floor area penalty of a full stud frame.
The floor was: existing concrete slab, damp-proof membrane, 75mm rigid PIR insulation board, 18mm structural-grade chipboard, and then the finished floor. Total floor build-up of approximately 100mm — which reduced the door threshold clearance slightly and required a new threshold detail on both the front and side doors, but produced a floor U-value of 0.22 W/m²K and a surface that’s warm underfoot.
Electric underfloor heating — a mat system on a programmable thermostat — was installed on top of the chipboard and beneath the finished floor. For a room of this size, electric underfloor heating is cost-effective and straightforward to install and control. The floor surface was chosen partly for its thermal conductivity: a 10mm engineered oak floor with good thermal properties over the mat.
The Front Elevation: Making It Belong
This is the design decision that most affects how a garage conversion reads from outside — and getting it right matters both aesthetically and in terms of the family’s relationship with their neighbours and their street.
The new front elevation — previously a garage door, now a rendered wall and window — was rendered to match the existing house render, in the same finish and painted in the same colour. The window frame is in an anthracite grey aluminium — a contemporary material choice that reads better against the 1970s house than white uPVC would — and the window proportions are appropriate to the opening and the scale of the building.
The result, from the street, is that the garage reads as a room rather than a garage, which is simply honest about what it now is. The render match is good enough that the conversion doesn’t read as an afterthought.
Interior Design: Making the Most of 14.5 Square Metres
Fourteen and a half square metres is not a large room, and the interior design had to be thoughtful about scale, storage, and the specific activities the room needed to support.
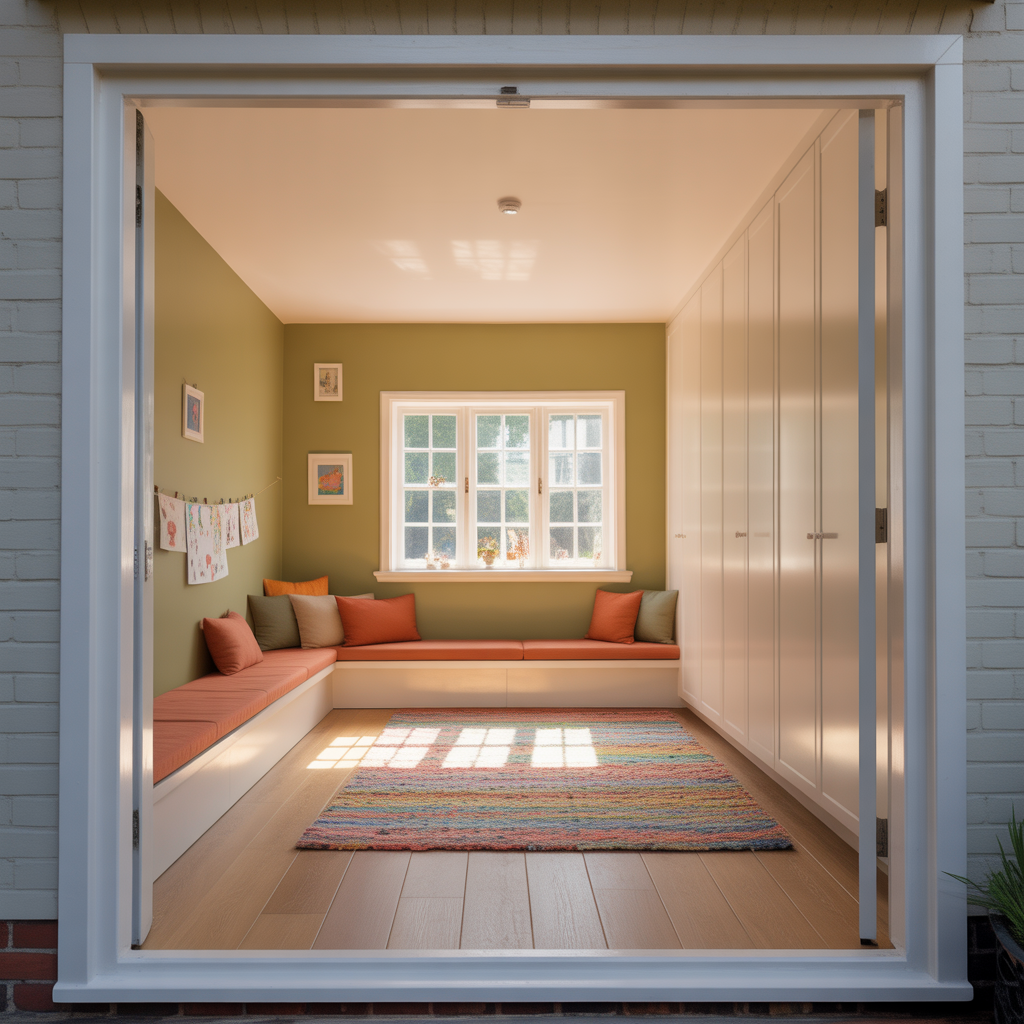
The primary colours chosen for the walls were a warm mid-tone — a muted sage green, which the family had seen in our previous work and specifically requested. The ceiling in white, which preserves the sense of height. The skirting and window board in off-white eggshell.
Built-in storage runs along the entire rear wall — floor-to-ceiling, in painted MDF, with a combination of open shelving at child height (accessible without adult help for the relevant age group) and closed cupboards above. This storage holds everything: art supplies, board games, dressing-up clothes, puzzles, and the rotation of toys that’s currently in favour. The closed upper cupboards hold things that come out less frequently or that are better kept out of sight.
A low built-in bench runs along the window wall below the sill, with storage underneath via lift-up lids. This serves as seating, as a reading spot, and as the landing place for everything that comes in and needs to be put down. The bench seat is upholstered in a practical, wipeable fabric in a warm terracotta that the eight-year-old chose — correctly — as the accent color for the room.
The floor area is kept completely clear of furniture. The only floor item is a large wool rug in the centre of the room, which defines the play zone and provides comfort underfoot. Tables, seating, and storage are all built in or wall-mounted, which maximises the usable open floor space that children actually need for play.
Lighting is a row of recessed downlights on a dimmer for general ambient, plus a wall-mounted light above the bench area for reading. All on separate circuits and all dimmable.
The Finish: Small Decisions That Made the Difference
A few details that improved the finished result beyond what the specification alone would have produced.
The window sill inside was made in solid oak — matching the engineered oak floor — rather than standard MDF. It’s a detail that costs marginally more and reads as quality every time you look at it.
The built-in bench was specified with a piano hinge rather than the standard lift-up mechanism, which means both hands don’t need to be free to open it — one hand opens the lid and it stays open on a gas strut while you retrieve something from underneath. Children actually use storage that’s easy to open. They don’t use storage that requires a specific technique.
The door to the garden was fitted with a half-height stable door arrangement — the lower half solid, the upper half glazed. The lower half can be closed independently to keep a younger child in the playroom while still allowing light and ventilation in through the upper section. A simple detail that the family uses every day.
Six Months On
The family reports that the playroom is the most-used room in the house, that the children consistently choose to be in it over any other space, and that the main house — freed from most of the clutter and noise of active child play — is noticeably calmer.
Converting a garage into a playroom is, done properly, one of the highest-return home improvement projects available for families with children. The space is already there. The structure is already built. The work required to make it genuinely habitable and genuinely designed is substantially less than building something from scratch, and the outcome — a dedicated, well-insulated, well-lit room that belongs entirely to the children and absorbs their world without it spilling across the rest of the house — is one that changes daily family life in ways that are felt rather than described.
It’s worth doing properly. And as this project demonstrated, doing it properly is entirely achievable.