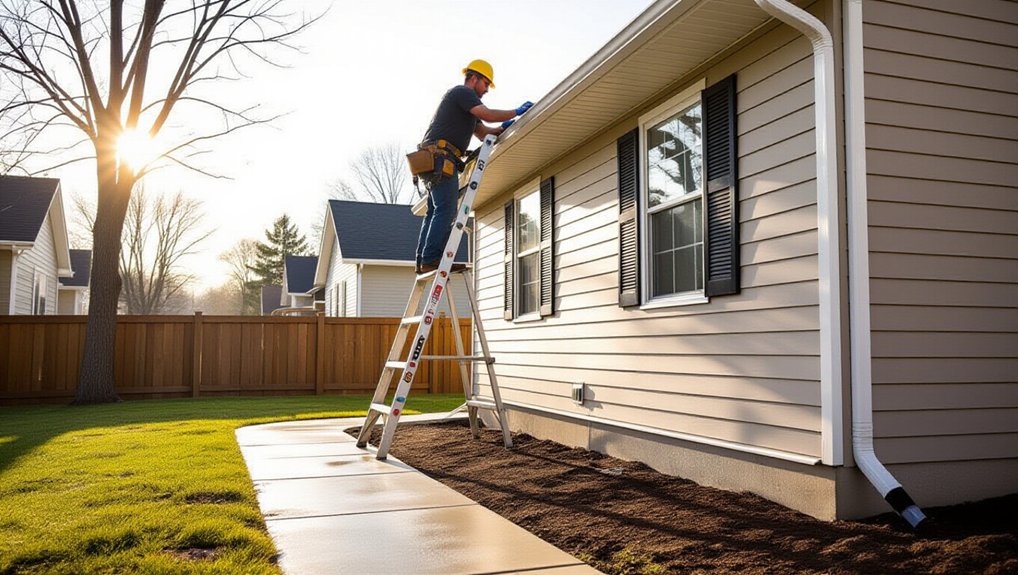
You can’t treat every exterior issue the same, because some defects turn into water intrusion and structural decay fast. Start with a walk-around and flag anything that affects weatherproofing or safe access: missing shingles, open flashing joints, loose siding, failed caulk at windows and doors, clogged gutters, and unstable steps or railings. Use a ladder only on firm ground and maintain three-point contact. Next, you’ll sort what needs immediate action—and what can wait.
Which Exterior Repairs Are Urgent vs Cosmetic?

Although some exterior issues only affect appearance, you should treat any repair as urgent when it can admit water, compromise structural capacity, create a fall or electrical hazard, or violate required clearances.
Prioritize active leaks at roofs, flashings, windows, and penetrations; deteriorated siding that exposes sheathing; spalled masonry; loose railings; uneven steps; and damaged service-entrance components.
Correct grading that directs water toward the foundation and keep required separation between soil, mulch, and siding to reduce rot and termite risk.
Maintain safe egress routes, lighting, and GFCI-protected exterior receptacles where required.
Cosmetic items typically include faded paint, minor surface staining, and small trim blemishes that don’t expose substrates.
You can schedule Exterior aesthetics and landscaping enhancements after hazards and water pathways are controlled.
Walk-Around Checklist: 10 Exterior Problem Spots
Before you call a contractor, do a slow walk-around with a flashlight and take photos so you can document conditions and prioritize repairs that affect water control, structural safety, and required clearances.
Check these 10 spots:
1) Roof edges for missing shingles and loose drip edge.
2) Gutters/downspouts for secure hangers and proper discharge.
3) Siding for cracks, rot, and failed caulk at penetrations.
4) Windows/doors for damaged trim, worn weatherstripping, and safe egress clearances.
5) Foundation for spalling, exposed rebar, or pest gaps.
6) Decks/porches for ledger flashing, guard height, and fastener corrosion.
7) Stairs/handrails for graspable profiles and secure anchors.
8) Driveways/walks for trip hazards.
9) Landscaping tips: keep soil 6 inches below siding.
10) Exterior lighting: verify GFCI protection and intact covers.
How to Catch Leaks Before They Spread

You can stop exterior leaks early if you spot warning signs like staining, peeling paint, soft trim, and musty odors before they turn into rot or mold.
You’ll inspect the most failure-prone areas—roof penetrations, flashing, gutters, siding joints, windows, doors, and foundation junctions—while using proper ladder setup and PPE.
Then you can confirm suspicions with simple, controlled leak tests (hose test, moisture meter, and targeted dye) so you document the source and repair it to code.
Spot Early Warning Signs
When water gets past your exterior cladding, it can travel behind layers and cause hidden rot or mold long before a stain shows up indoors. You can spot early warning signs by tracking musty odors, persistent humidity, or peeling paint near exterior walls and ceilings.
Watch for efflorescence on masonry, bubbling caulk lines, warped trim, or fasteners that rust prematurely. After rainfall, note puddling at the foundation and soil that stays saturated for days.
During Landscaping maintenance, keep mulch and grade below cladding clearances so you can see dampness and prevent wicking.
Use Exterior lighting to scan surfaces at night; raking light reveals sheen changes, hairline cracks, and subtle swelling.
If you suspect moisture, shut off power to affected areas and document conditions for a qualified professional.
Inspect Vulnerable Exterior Areas
Early warning signs tell you moisture’s present; targeted inspections help you pinpoint where it’s getting in so you can stop it fast. Walk the perimeter and check roof-to-wall intersections, flashing edges, chimneys, skylights, and all penetrations for gaps, lifted sealant, or missing fasteners.
Inspect siding terminations, weep paths, and trim joints for cracked caulk and soft spots. At windows and doors, verify intact glazing seals, sloped sills, and continuous weatherstripping.
Confirm gutters, downspouts, and splash blocks discharge away from the foundation; look for soil washouts and damp crawlspace vents.
In Exterior landscaping, keep grade sloped away and mulch below siding clearances. During fencing maintenance, check posts near structures for rot that can hold moisture against walls.
Use Simple Leak Tests
Although a thorough visual check catches many problems, simple leak tests confirm active water entry before it wicks into framing or insulation.
Start indoors: tape plastic below suspect windows, doors, and roof penetrations, then run water from a hose outside for 10–15 minutes per section, working bottom-up. Keep spray angles realistic and avoid forcing water uphill against flashing, per manufacturer and code intent. Watch for drips, darkening, or damp odors; mark findings and stop testing once you detect leakage to prevent damage.
Check gutter joints by filling them with water and observing seams.
In garden landscaping areas, confirm grading drains away from the foundation.
For exterior lighting, shut power off at the breaker and test boxes with a gentle mist; water inside means failed gaskets or caulk.
Fix Siding Cracks and Loose Panels
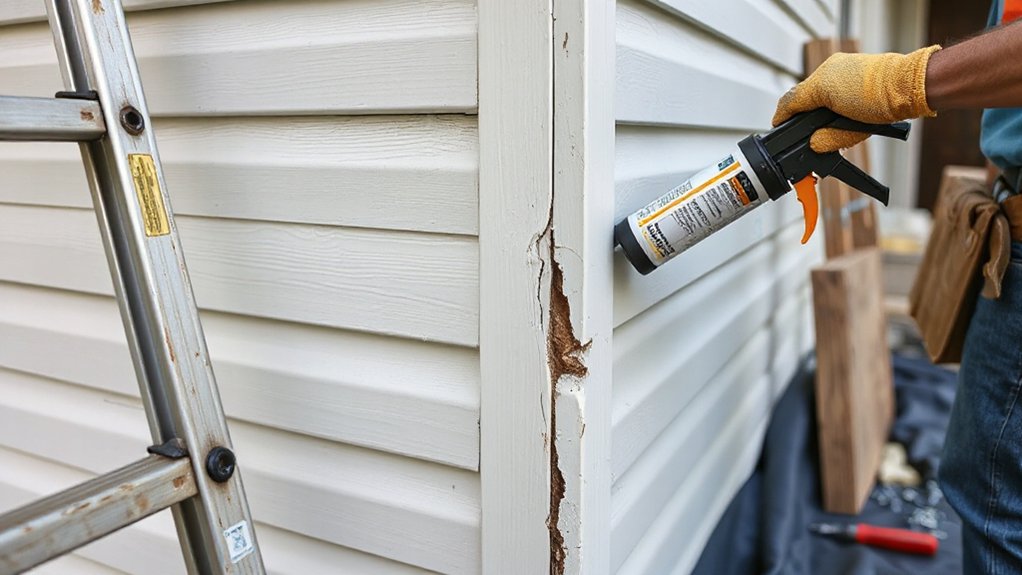
Next, you’ll inspect siding cracks and loose panels to pinpoint the cause—impact damage, heat warping, moisture intrusion, or fastener failure—so you don’t trap water behind the cladding.
You’ll reseal gaps with the manufacturer-approved sealant and maintain required clearances at joints, trim, and penetrations to keep the assembly code-compliant.
Then you’ll refasten or replace loose panels using corrosion-resistant fasteners driven into solid backing.
You’ll work from a stable ladder or scaffold setup to prevent falls and further damage.
Identify Crack Causes
Before you patch a siding crack or re-seat a loose panel, identify what caused it so your repair meets code intent and doesn’t fail again. Start with a close inspection in dry weather: note crack direction, width, and whether it aligns with studs, corners, or fastener lines. Check for impact dents, lawn equipment strikes, or hail signatures.
Evaluate moisture sources—failed flashing, leaking gutters, or missing kickout—because trapped water can warp panels and open seams. Confirm foundation stability by looking for stair-step masonry cracks, uneven door gaps, or sloped trim that may telegraph movement into cladding.
Review exterior paint for peeling, blistering, or chalking that signals moisture or UV breakdown. Use ladders and PPE correctly, and document findings for permits, warranties, and insurers.
Reseal And Refasten Panels
Once you’ve confirmed what’s driving the crack or movement, you can lock the siding back into a weather-tight, code-intent assembly by resealing openings and refastening panels correctly. Shut off exterior power, set stable ladder footing, and wear eye protection before you start.
Remove failed caulk, clean and dry the joint, then apply compatible sealant with a continuous bead for panel resealing; don’t bridge weep paths or block drainage planes.
Re-seat the panel in the starter/lock, then perform panel refastening using corrosion-resistant nails or screws into framing, centered in nailing slots, snug but not tight to allow thermal movement.
Replace cracked pieces, maintain required clearances at roofs and grade, and verify flashings lap shingle-style.
Seal Windows and Doors to Stop Drafts
Although drafts can feel minor, they signal gaps at windows and doors that waste energy and can pull moisture into the wall assembly.
Start by checking operable sashes and door slabs for full, even contact at the stops and thresholds. Replace worn weatherstripping with code-appropriate, exterior-rated compressible seals, and verify the door sweep meets the sill without binding.
Adjust hinges, strike plates, and latch alignment so the door closes tight and doesn’t rack.
For windows, confirm locks draw the sash snug and that glazing beads aren’t loose. If you use storm windows, guarantee they fit square, drain properly, and don’t block required egress operation.
Reinstall decorative shutters without pinching frames or interfering with safe window opening and screen removal.
Close Gaps in Caulk, Trim, and Flashing
Because small openings at exterior joints can route bulk water behind cladding, you should inspect and close gaps in caulk, trim, and flashing before they become rot or mold problems. Check siding-to-trim edges, penetrations, and window head flashing terminations for cracks, voids, or failed adhesion.
Remove loose sealant, clean to sound, dry substrate, and backer-rod deep joints so you don’t three-side bond. Choose a sealant rated for exterior exposure, UV, and movement, and confirm material compatibility with painted wood, fiber cement, masonry, and metals to prevent corrosion or staining.
Tool the bead for full contact and positive shedding, then verify laps and kick-outs remain unobstructed. Use Color matching to maintain appearance while meeting performance.
Wear gloves, eye protection, and stable ladder footing.
Roof and Gutter Fixes That Stop Rot
If you stop roof water at the source and move it off the building fast, you’ll prevent the chronic wetting that drives fascia, soffit, and sheathing rot.
Inspect shingles, valleys, and penetrations; replace failed boots, re-seat loose flashing, and seal only where manufacturers allow. Keep drip edge continuous and tied into underlayment so water can’t wick behind trim.
Clean gutters, verify slope to downspouts, and secure hangers at code-appropriate spacing.
Extend downspouts to discharge well away from the foundation, and confirm landscape grading falls away so runoff can’t pond at walls.
Repair rotten fascia before rehanging, then prime and protect with Exterior paint.
Use fall protection, stable ladders, and gloves when removing debris and sharp granules. Recheck after storms.
Repair Steps, Porches, and Railings Safely
You’ll inspect every step for rot, looseness, and settlement, then reinforce stringers, treads, and connections with approved fasteners and solid blocking so the assembly meets load requirements.
You’ll repair porch railings by tightening posts to framing, replacing split members, and securing top rails and balusters with code-compliant spacing and corrosion-resistant hardware.
Before you reopen the area, you’ll verify handrail height, graspability, and attachment strength, and you won’t rely on nails, caulk, or paint to carry structural loads.
Inspect And Reinforce Steps
Before you pick up a drill or pry bar, inspect every step, porch board, and railing connection for movement, rot, splits, corrosion, or loose fasteners, since these defects can turn a simple repair into a fall hazard.
Check stringers, treads, and landing framing for deflection; probe suspect wood with an awl and replace any member that’s soft, punky, or cracked.
Tighten or replace fasteners with exterior-rated structural screws or hot-dipped galvanized hardware, and set correct embedment into sound framing.
Add solid blocking under loose treads and re-shim contact points so loads transfer evenly.
Verify rise/run consistency and slip resistance.
Keep access clear during landscaping enhancements, and confirm outdoor lighting reveals edges and damage at night.
Repair Porch Railings Securely
Although railings can feel solid at a glance, treat any wobble, corrosion, or loose joint as an immediate safety issue and repair it to code. Start by checking post bases, fasteners, and any rot at deck or concrete contact points. Tighten through-bolts; replace lag screws with bolts and washers where framing allows.
Verify your guard height and baluster spacing meet local requirements, then mark each defect before disassembly.
Choose compatible railing materials: pressure-treated lumber, galvanized steel, or aluminum components rated for exterior use. Remove rust, prime, and repaint, or replace sections that have pitting or cracks.
Use exterior-grade adhesive only as a supplement, not a structural fix. Re-anchor posts with approved brackets, and seal all end grain.
Reinstall porch decor only after the railing is rigid and plumb.
Fix Peeling Paint Before Wood Rots
When paint starts peeling, it stops protecting the siding and trim from bulk water, and moisture can wick into the wood through exposed end grain and joints. You’ll prevent rot by treating peeling areas as an exterior envelope defect, not a cosmetic issue.
Scrape to sound edges, feather-sand, and remove dust; capture chips and follow lead-safe rules on pre-1978 homes. Prime bare wood immediately with an exterior, stain-blocking primer, then caulk only where allowed—don’t seal drainage gaps or weep paths.
Replace any punky sections; don’t paint over soft fibers. Topcoat with two compatible exterior coats at the manufacturer’s spread rate and cure window.
Wear eye/respiratory protection and use stable ladders. This Paint maintenance supports long-term wood preservation.
Patch Driveway and Walkway Cracks Early
Peeling paint lets water reach wood, and the same bulk water and freeze–thaw cycles will also widen small cracks in your driveway and walkways into trip hazards and spalling slabs. Treat crack sealing as preventive driveway maintenance, not cosmetics.
Clean debris, remove loose edges, and dry the surface; patching over moisture won’t bond. For hairline cracks, use a concrete crack sealant; for wider gaps, use a polymer-modified patch or backer rod plus sealant to limit depth. Keep repairs flush to reduce toe-stub risk and meet safe-walking expectations.
Maintain positive drainage away from slabs and don’t block expansion joints. If cracks show heaving, settlement, or rebar exposure, schedule walkway repair by a qualified concrete contractor. Recheck annually.
Frequently Asked Questions
How Often Should I Schedule Professional Exterior Inspections?
Schedule professional exterior inspections annually, and add a post-storm check. You’ll meet safety expectations by verifying gutter maintenance, securing landscape lighting, checking flashing, siding, grading, and documenting hazards for prompt, code-compliant corrective action.
What Exterior Repairs Add the Most Resale Value?
You’ll add the most resale value by fixing roof leaks, replacing damaged siding, and upgrading entry doors/windows to meet current codes. Choose durable Exterior paint choices, plus Landscaping upgrades with proper grading, drainage, and safe walkways.
Do I Need Permits for Exterior Repairs on My Property?
Yes, you often do—like walking a tightrope, you must balance permit requirements and repair regulations. You should check local codes, HOA rules, and scope; structural, electrical, plumbing, and reroofing typically require permits.
What’s the Best Season to Tackle Major Exterior Repairs?
You’ll get the best results in late spring or early fall, when mild temperatures support curing and adhesion. Use season planning and weather considerations: avoid storms, extreme heat/cold, and verify dry, safe access.
How Can I Budget and Prioritize Repairs When Funds Are Limited?
Like triage in a storm, you rank repairs by safety and code risk first, then water intrusion. Get quotes, set a Cost effective reserve, and use DIY strategies only for low-risk, permitted tasks.
Conclusion
Stay sharp and stay safe: you’ve spotted the urgent vs. the merely cosmetic, and you’re ready to act. When you seal seams, secure siding, and stop sneaky seepage early, you’ll prevent rot, mold, and costly callbacks. Keep guardrails, steps, and porches firm and fastened, and follow ladder, PPE, and fall-protection rules every time. Clear gutters, correct flashing, and coat peeling paint promptly—small, steady fixes keep your property sound, sturdy, and stylish.