Table of Contents
The decision to build bespoke laundry room cabinets rather than install off-the-shelf units was made about twenty minutes into the first site visit. The room was an irregular shape — a former pantry off the kitchen in a 1920s detached house in Surrey — with a chimney breast projection on one wall, a ceiling that dropped at the far end where the staircase above it ran diagonally, and a window positioned at a height that no standard wall unit range would accommodate without either sitting above it awkwardly or cutting into the cill below it. The room was, in short, exactly the kind of space that makes kitchen showroom sales representatives nervous and that handbuilt cabinetry was invented for.
The clients had lived with inadequate storage in that room for six years. The machines sat on the bare concrete floor with a plywood sheet over them that functioned as a worktop in the most provisional sense. Cleaning products were on a freestanding chrome shelf that had come from a bathroom sale a decade ago and had never felt at home anywhere it had subsequently lived. The ironing board was in the hallway cupboard under the stairs, which meant ironing happened in the hallway. The general atmosphere was of a room that had been set up temporarily and never returned to.
What we built took eleven days. It’s the kind of installation that doesn’t announce itself — you don’t notice the cabinets, you just notice that everything has a place and the room works.
Starting With the Brief
Before a single measurement was taken, we spent an hour with the clients understanding exactly what the room needed to do. This is the conversation that most people skip, and skipping it produces cabinetry that looks good and doesn’t quite work.
Their list, once we’d extracted it through enough questions to get past the vague “more storage” answer that usually comes first:
The washing machine and tumble dryer needed to be accessible from the front but invisible from the kitchen doorway. Both machines needed to be able to be serviced without dismantling the cabinetry. The worktop above them needed to be higher than standard kitchen height — she is tall, and years of bending over a 900mm surface had convinced her this mattered. It does.
A dedicated space for the ironing board that didn’t involve going to the hallway cupboard. A specific shelf for the laundry basket — not floor level, where it was always in the way, but at a height where loading the machine from it didn’t require awkward bending. A tall section for mops, brooms, and the vacuum cleaner. Separated closed storage for cleaning products, with a lock, because they have a three-year-old who visits frequently. Open shelving for the things that needed to be visible and accessible: washing powder in a jar, a small radio, the collection of mesh laundry bags that otherwise migrated across the room.
With this list, the layout almost designed itself.
The Design
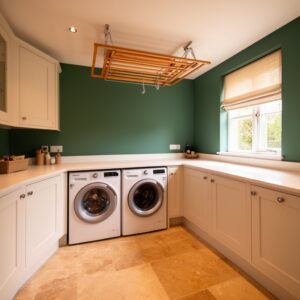
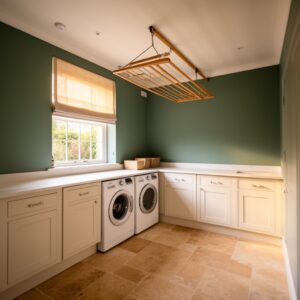
The irregular room shape, which had looked like a problem, turned out to be a design asset. The chimney breast projection divided the long wall naturally into two zones — the machine zone on the left of the breast, and the tall storage zone on the right. The diagonal ceiling drop at the far end meant the tall units needed to be stepped in height, which in turn produced a more interesting visual profile than a flat run of uniform-height cabinetry.
The machine zone: two base units, each housing one machine, with doors that matched the adjacent cabinetry. The worktop above at 960mm — higher than standard — running the full width of the zone and returning 200mm on the chimney breast face to create a small folding ledge. Above the worktop, a run of wall units to the ceiling, with the centre section left open — a combination of closed cupboards flanking an open shelf zone that housed the jars, the radio, and a small plant.
The tall storage zone: a floor-to-ceiling arrangement divided into three sections. Left section: the built-in ironing board housing, hinged at the left edge, so the board swings out to the right into the open circulation space. When closed, this looks like a cabinet door. When open, it’s a full-size ironing station with the iron’s cable feeding through a dedicated slot to the socket inside the cabinet. Centre section: a full-height broom cupboard with internal hooks, a small shelf at the top for the dustpan, and a magnetic closure that keeps the door firmly shut without a handle. Right section: the locked cleaning products cabinet at the bottom, with a standard shelved cupboard above for miscellaneous utility items.
The laundry basket shelf: a fixed shelf at 600mm from the floor, with a shallow lip to prevent the basket sliding forward, positioned in the space between the machine zone and the tall storage zone — essentially occupying the face of the chimney breast. The basket sits at the right height to load the machine without bending. The machine door, when open, reaches exactly to the front edge of the basket shelf. These measurements were worked out with both clients present, with a tape measure, before the design was finalised. Small details, exact consequences.
The Materials
The carcasses are 18mm birch-faced plywood throughout — not MDF. The choice matters. A laundry room has intermittent damp, and MDF carcasses in a damp utility environment eventually swell at edges and joints in a way that solid plywood doesn’t. Birch ply is also considerably stronger for its thickness, which matters for the shelving spans involved in the tall storage section.
The door faces are 22mm MDF — the extra thickness over standard 18mm gives the doors more rigidity and a more substantial feel when opened and closed. All edges are iron-on hardwood lipping, applied and trimmed flush, which prevents the cut MDF edge from swelling with moisture and gives the door a solid, well-made quality at the edges.
The worktop is a 40mm solid oak board — not a laminate, not a composite, but real timber. The clients specifically wanted the warmth of natural timber in the room, and the worktop is where a material decision like that registers most directly because it’s the surface most often in contact. Oak is appropriate for a utility room if it’s properly oiled — we used three coats of a hard-wax oil, buffed between coats, which produces a surface that repels water, is easy to maintain, and improves with age rather than deteriorating. A white ring from a wet cup cleans off with a quick wipe. A cut or scratch can be sanded out and re-oiled. It’s a material that works in real conditions rather than just in photographs.
The drawer boxes are dovetailed solid oak — handcut rather than jig-cut, which is slower and more expensive but produces joints that are structurally superior and visually distinctive. The drawers run on full-extension soft-close runners, which is the detail that most immediately communicates quality to anyone using the room. A drawer that closes itself gently from any position doesn’t require thought or care. It just works.
The Build
The sequence of a handbuilt cabinetry installation in an irregular room differs from standard kitchen fitting in one significant respect: every element is made and fitted to the specific conditions of the room rather than to standard dimensions. This means the measurement, marking, and checking process that precedes each panel being fixed in place is more extensive, and the tolerance for error is tighter.
The base cabinets went in first, levelled carefully on adjustable legs and then scribed at the base to the slightly uneven floor. Scribing — cutting the bottom edge of a panel to follow the contour of the floor rather than leaving a gap — is the detail that makes a handbuilt installation look built rather than dropped in. A 2mm gap between the base of the cabinet and a slightly uneven floor looks fine on installation day. Over time, and with the accumulated light of different times of day, it becomes the thing that catches the eye.
The machines were placed and connected before any worktop or upper carcasses went in — the sequence that ensures everything can be accessed for plumbing and electrical connections without the surrounding cabinetry getting in the way. The machine door clearances were checked on both machines, which required the cabinet doors to be positioned carefully enough that the machine doors clear the cabinet face when fully open. This is the measurement that’s easy to overlook and difficult to fix retrospectively.
The worktop went on in a single piece — one length of oak, bookmatched at the return to the chimney breast face, with the grain running in the same direction throughout. The joint at the return is a mitre, cut on the table saw and hand-fitted until it closed without a gap. A mitred timber worktop joint is one of those details that’s invisible when it’s right and very obvious when it’s wrong. We spent about forty minutes on that joint.
The tall section came last. The ironing board housing required the most careful thought: the pivot point for the board needed to be positioned so that the board, when extended, was at exactly the right height for the client to use comfortably while standing on the kitchen floor outside the room — because the laundry room floor is on the same level, but she prefers to iron standing in the doorway when the kitchen is busy. We tested this with the actual ironing board before fixing the pivot.
Paint and Finish
All painted elements — carcasses, door faces, the interior of the open shelving zone — were painted off-site before installation, in a colour the clients had chosen after living with a large sample on the wall for two weeks. The colour is a warm mid-blue, slightly greyish, with enough warmth in it to feel welcoming rather than cool. The inside of the cabinets is a lighter tone of the same colour family — the detail that makes opening a well-painted cabinet feel like revealing something rather than just accessing storage.
The finish is an eggshell — sprayed in the workshop for a fine, even surface that a brush-applied finish can’t match in smoothness. Two coats of primer, two coats of eggshell, a light flat-back between coats. The result is a surface that looks factory-finished and holds up to the regular cleaning that a utility room requires.
The oak worktop and drawer fronts were left in their natural finish — the hard-wax oil — which means the room has two distinct materials: the painted elements and the natural timber. This combination is one of the most reliable in handbuilt cabinetry: the painted surfaces provide the graphic structure and the colour, the natural timber provides the warmth and the organic variation that prevents the room from feeling clinical.
The Hardware
Handles are solid brass — a simple bar handle, the same across all doors and drawers, sized proportionally to the door width. Brass is the right choice in a utility room: it develops a natural patina over time that improves rather than deteriorates, it’s substantially more durable than the soft zinc alloys used in lower-priced handles, and it has a warmth that works with both the painted cabinet colour and the oak surfaces.
Hinges are soft-close throughout — concealed cup hinges on the doors, adjusted on site to produce a perfectly flat front. The soft-close mechanism is engaged on every hinge, which means every door closes quietly and fully without being pushed. This matters more in a utility room than it might elsewhere because the room is often in use when the household is busy and attention is elsewhere — drawers pulled out and left, doors not pushed fully closed. Soft-close hardware removes most of this from the equation.
Eleven Days and Six Years of Gratitude
The installation took eleven working days from first carcass to final adjustment. The clients came into the room on the last day and stood in it for a while before saying anything. The first comment was about the ironing board, which had been taken from the hallway cupboard and installed in its new home. “I didn’t realise how much I hated ironing in the hall,” she said, “until it wasn’t there anymore.”
That’s what handbuilt laundry room cabinets do at their best. They don’t transform the laundry. They transform the experience of doing the laundry, quietly and persistently, every day. The room that was an afterthought becomes a room that works — that holds everything it needs to hold, that opens and closes as it should, that looks good enough that you don’t mind being in it for an hour.
Six years of making do. Eleven days of doing it properly. The ratio is the thing worth fixing.