Start by doing a 10‑minute storage audit and sort everything into daily, weekly, occasional, and archived. Keep only daily essentials on your desk, then move the rest into vertical storage like wall shelves, pegboards, and labeled rails. Use drawer dividers and an IN/TO SIGN/TO FILE tray to stop paper piles. Route cables to one power path with clips and ties, and store tech extras in caddies. Keep it all tidy with a 10‑minute weekly reset, and you’ll find even more ways to streamline.
Do a Quick Home Office Storage Audit
Before you buy bins or add shelves, take 10 minutes to audit what you already store and where it’s landing. Set a timer, grab a notepad, and scan your room in zones: desktop, drawers, shelves, floor, and nearby closet. In each zone, list what’s there and why it ended up there (habit, convenience, no assigned home).
Next, sort items into four quick buckets: daily-use, weekly-use, occasional, and archived. Note their sizes and any special needs (cords, paper, fragile items). Measure the storage space you can realistically use—height, depth, and reach.
Finally, map each bucket to a location and flag gaps where organizational tools will help, like labels, cable ties, file folders, or a slim drawer tray.
Decide What Stays on Your Desk
Although it’s tempting to let your desk become a catch-all, you’ll work faster when only true daily-use items stay within arm’s reach. Start by listing what you touch every work session: laptop, primary notebook, pen, charger, and a water bottle. Everything else earns a new home.
Set a simple rule: one surface zone for work, one small zone for reference. Keep only your current project folder or planner in the reference zone, then clear it at day’s end.
Choose ergonomic accessories you actually use—keyboard, mouse, wrist rest—and remove backups. Limit Personalized decor to one or two pieces that don’t steal space or attention.
If an item hasn’t helped you finish work in a week, it doesn’t belong on the desktop.
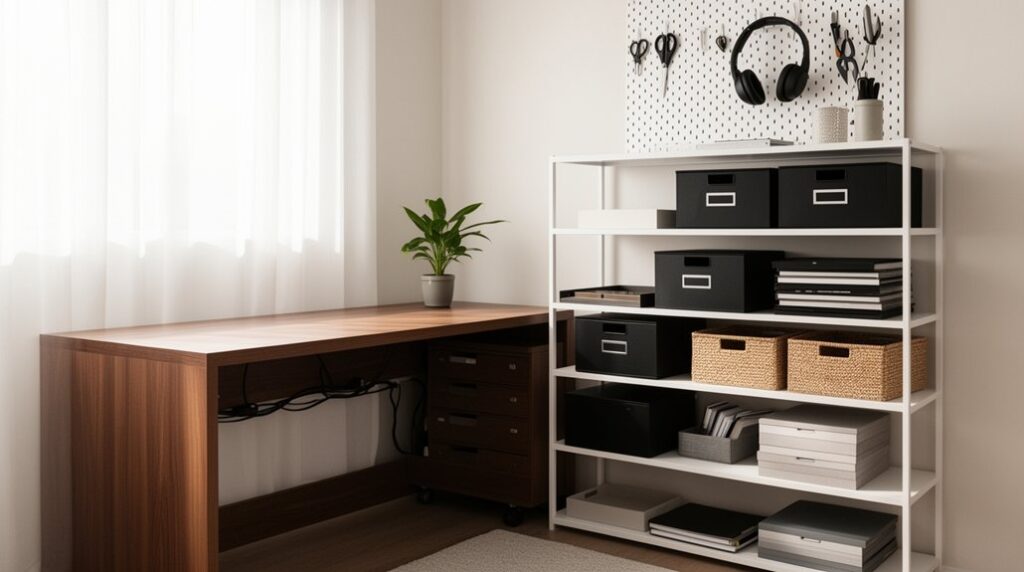
Go Vertical: Shelves, Pegboards, Wall Rails
When your desktop feels tight, you can reclaim working space by moving storage up the wall. Start with Vertical organization: place shelves above your monitor for books, bins, and reference gear you don’t use hourly. Keep the lowest shelf within arm’s reach so you don’t strain or stand up constantly.
Add Wall mounted solutions like a pegboard to park headphones, scissors, tape, and charging cables on hooks; outline zones so everything returns to the same spot. Install a wall rail with movable cups and clips for pens, mail, and small tools, then label each holder.
Use one “inbox” tray on the rail for papers that need action, and clear it daily. This system keeps surfaces open and workflow smooth.
Organize Desk Drawers for Daily Supplies
If you set up your desk drawers like a tool kit, you’ll stop overloading the desktop with daily supplies. Start by emptying each drawer and sorting items into daily, weekly, and rarely used groups.
Keep only daily essentials within arm’s reach in the top drawer. Install drawer dividers to create fixed zones for pens, sticky notes, chargers, and scissors, so nothing drifts into a junk pile.
Add shallow supply organizers for small items like clips, USB drives, and spare leads; choose modular pieces you can reconfigure. Assign one category per compartment and label the underside of each tray to lock in the system.
Put backups and bulky items in a lower drawer, stored front-to-back for quick grabs. Do a 60-second reset nightly.
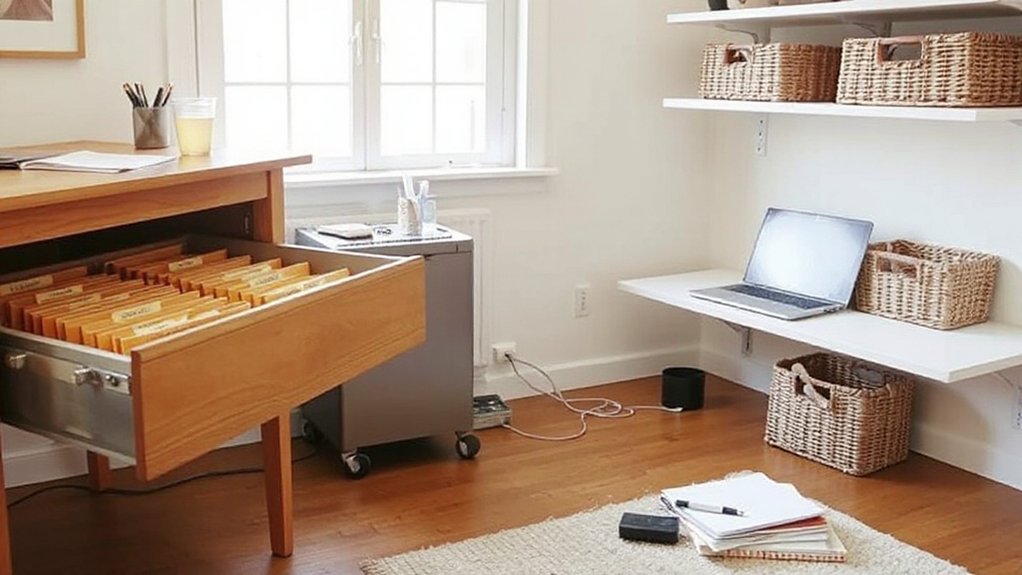
Stop Paper Piles With Simple File Storage
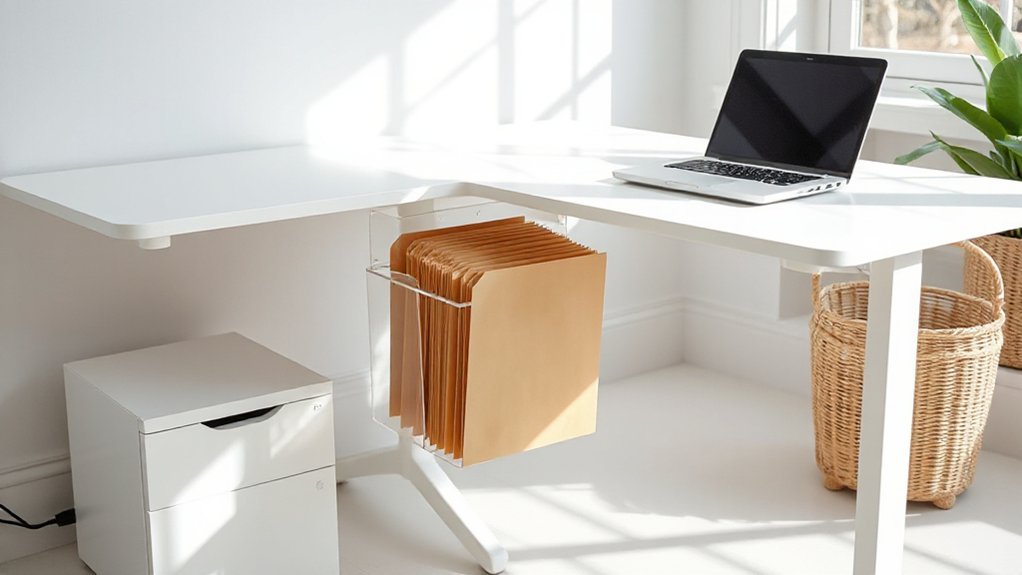
Paper piles form because loose sheets don’t have a defined landing zone, so give every document a clear next step the moment it hits your desk. Place a slim vertical file or two-tier tray at arm’s reach and label actions: IN, TO PAY, TO SIGN, TO FILE. You’ll sort once, not repeatedly. Keep only current projects on top; everything else goes into a dated folder.
Set up a small file box for “Reference” with 5–7 categories you actually use, then purge monthly.
To shrink paper further, scan receipts and statements the same day and name files consistently for Digital organization. Build Paperless workflows by switching bills to e‑delivery, saving PDFs to one folder, and shredding originals you don’t need.
Use Hidden Storage: Credenzas, Ottomans, Risers
Once you’ve contained loose documents, reclaim desk space by pushing bulkier supplies into hidden storage that works as furniture. Place a low credenza behind you and sort items by frequency: daily tools in top drawers, weekly supplies in labeled bins, backups on the bottom shelf.
Choose models with hidden compartments for chargers, notebooks, and spare peripherals so surfaces stay clear. Add a storage ottoman that doubles as extra seating; stash headphones, manuals, and shipping materials inside, then close the lid to reset the room instantly.
Use monitor risers with built-in trays to park pens, sticky notes, and small gadgets beneath your screen. These versatile furnishings keep essentials close, but out of sight, so your workflow stays focused and tidy.
Tame Cords With Home Office Cable Management
Although cords seem harmless, they quickly steal workspace and turn a clean setup into daily friction. Start by mapping every device to one power path, then shorten runs with the nearest outlet or under-desk power strip.
Route lines along the back edge of your desk with adhesive clips, and bundle only where they travel together using reusable ties. For cable concealment, mount a wire tray under the desktop and drop cords straight down behind a leg, not across the floor.
Use grommet holes or a cable sleeve to keep one clean “spine” to the wall. Reduce what you manage by choosing wireless solutions for peripherals when possible. Label both ends of each cord so you can swap gear fast without re-tangling.
Corral Tech Extras: Chargers, Drives, Headsets
Set up a designated charging station so every charger lives in one spot and your desk stays clear.
Store spare cables in a small bin with labeled wraps, so you can grab the right one fast without tangles.
Add compact caddies for your headset and external drives to keep them protected, visible, and off your work surface.
Designated Charging Station
When your chargers, external drives, and headset don’t have a single home, they end up scattered across your desk and waste both space and time. Create a designated charging station that lives off your main work surface: a slim tray on a shelf, a wall-mounted caddy, or a drawer insert near an outlet.
Add a compact pad for wireless charging so your phone drops in without hunting for a plug. Park external drives and a headset on dedicated slots or hooks so they return to the same spot every time.
Keep one multi-port hub there for daily devices and store backups beside it. Finish with power strip organization inside the station so you reach one switch, not a tangle.
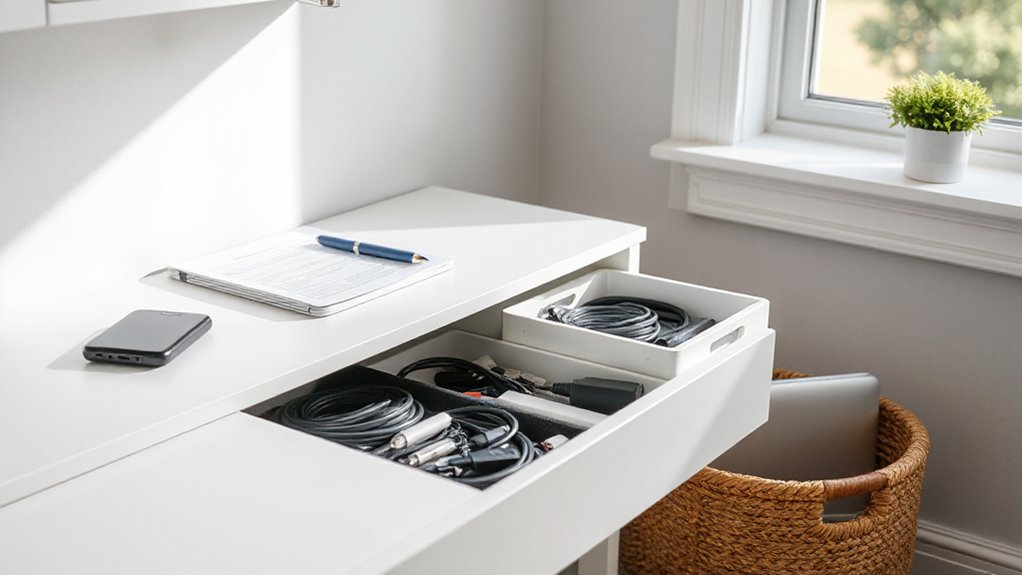
Labeled Cable Storage
Since tech extras multiply fast, labeled cable storage keeps chargers, drives, and headsets from drifting into every drawer. Start by sorting cords by device type and frequency, then coil each cable to a consistent length with reusable ties. Use cable labeling on both ends (USB‑C, Lightning, HDMI, power) so you can grab what you need without unspooling everything.
Store each labeled bundle vertically in a shallow bin or divided drawer tray to save footprint and prevent tangles. Dedicate one small section for adapters and tiny drives in lidded cups so they don’t disappear.
Maintain cord organization with a simple rule: when you unplug, you re‑coil, re‑label if needed, and return it to its slot immediately. Weekly, purge duplicates.
Headset And Drive Caddies
Where do your everyday tech extras land—desk edge, random drawer, or the nearest outlet? Give them a single, repeatable home with headset and drive caddies so you’re not hunting mid‑call or mid‑backup.
Mount a headset hook under your monitor shelf or on the desk’s side rail; route the cable through a small clip to prevent snagging and keep headset organization consistent.
For storage media, choose drive caddy options that match your workflow: a vertical 2–4 slot dock for frequent swaps, a labeled zipper case for travel, or a wall‑mounted pocket for rarely used archives.
Park chargers in a divided tray beside the dock, and keep one short USB‑C lead per device. You’ll free surface space and speed setups daily.
Choose Space-Saving Home Office Storage Furniture
How do you add storage without sacrificing your workspace? Start by choosing pieces that work vertically and multitask. Pick a slim bookcase or wall-mounted shelves above your monitor to keep reference items off the desktop.
Use a filing cabinet that doubles as a printer stand, or a credenza with sliding doors that hide supplies fast. For small rooms, choose a desk with built-in drawers, a pullout keyboard tray, and cable channels so cords don’t sprawl.
Add a rolling drawer unit that tucks under the desk and moves where you need it. Prioritize ergonomic furniture with clean lines, then finish with decorative accents like matching bins or a lidded box that still looks intentional.
Keep clear zones for daily tools.
Do a 10-Minute Weekly Reset to Maintain Order
Even if your storage setup is solid, clutter creeps back in unless you reset it on a schedule. Block 10 minutes weekly for quick Time management that protects your workflow and keeps surfaces clear. Set a timer, then follow the same order every time so you don’t waste decisions.
Start at the desktop: trash, cups, loose papers—clear them. File or scan anything you must keep, then park it in one labeled folder or tray. Reset your tools: return pens, chargers, and sticky notes to one caddy, not multiple drawers. Tidy cables with clips, and stash extra tech in a small bin.
Finish with your ergonomic setup: center the monitor, align keyboard and mouse, and clear leg space. Stop when the timer ends.
Frequently Asked Questions
How Can I Prevent Storage Bins From Making My Office Look Cluttered?
Choose matching, stackable bins and limit them to one zone, so you control visual noise. Use decor organization with uniform colors, hide extras in cabinets, and apply labeling techniques on fronts for quick retrieval.
What Are the Best Storage Solutions for Shared Home Office Spaces?
Choose modular shelving, labeled drawer units, and a shared filing cabinet so you keep office organization tight. Use vertical wall storage and under-desk carts for space optimization. Assign zones, rotate supplies, and hide cables.
How Do I Store Confidential Documents Securely at Home?
Lock it down: store paper in a fireproof, lockable safe or filing cabinet, limit keys, and label discreetly. For digital security, encrypt files, use strong passwords, enable MFA, and apply strict privacy measures.
Which Storage Options Work Best for Renters Who Can’T Drill Walls?
You’ll do best with Creative shelving like tension poles, over-door racks, and freestanding ladder units, plus Portable cabinets on casters. Use stackable bins, under-desk drawers, and adhesive hooks to zone supplies efficiently.
How Can I Keep My Home Office Storage Kid- and Pet-Proof?
Turn your office into a locked toolbox, not a toy chest: mount bins high, add Child proof locks to drawers, and use Pet safe containers for cords and supplies. Route cables in sleeves, stash chemicals away.
Conclusion
You’ve audited your space, kept only desk essentials, and pushed storage upward with shelves and rails. Your drawers now hold daily tools, files stop paper piles, and cable management keeps cords from creeping like vines. Tech extras live in one labeled bin, and space-saving furniture does double duty. To keep it that way, set a 10-minute weekly reset: clear surfaces, refile papers, return tools, and wipe down. Your office stays lean and ready.